
This blog post about teaching blues singing was written by Carmen Carpenter. Carmen has taught music in a school setting and in her home studio for almost 30 years. Teaching combines two of her favourite things: music and kids! Besides teaching music, Carmen loves spending time with family playing games, working on puzzles and watching movies. She’s also an avid reader and loves taking long walks on her local, woodsy trails.
Singing is a fantastic ear training tool whether you’re teaching piano, trumpet, harp or even the kazoo. But if the idea of singing with your music students makes you feel blue, why not embrace that and use blues music to banish your singing blues?


🎵Buh-duh-duh-duh-dum🎵
It’s time for a lesson
🎵Buh-duh-duh-duh-dum🎵
‘bout singing the blues
🎵Buh-duh-duh-duh-dum🎵
but I don’t know singin’
🎵Buh-duh-duh-duh-dum🎵
and I don’t have a clue.
I’ve got the “singing the blues” BLUES!!!
Does teaching your students to sing the blues have YOU singing the blues? You’re not alone. Plenty of music teachers are hesitant to sing with (or in front of) their students.
But you don’t have to be a professional vocalist yourself to benefit from using singing in your music teaching studio.
Having a few easy tools in your toolbox to improve vocal technique will help you become more comfortable with your own singing and in getting your students to sing along, too.
Let’s Sing the Blues!
If you want to introduce your students to the blues music style, you’ll definitely want to check out the “Meet the Blues” group workshop plan, which members of Vibrant Music Teaching can access instantly in the Printable Library. (Why reinvent the wheel, right?)

For the purposes of this post, I’m going to use the song Piano Practice Blues from the workshop plan. Of course, you can use any blues-style song to explore these singing tricks.
If you’re not a member of Vibrant Music Teaching, see what you’re missing out on at vibrantmusicteaching.com.
Singing Tip No. 1: Energise Your Breathing
A good vocal technique brings an energetic, vibrant quality to singing. Without solid, consistent breath management, the voice can sound breathy and thin.
Energetic singing requires not only an inhalation that expands the waist but also firm belly support while singing. This effort becomes particularly difficult on longer phrases.
Unless your students have a strong background in vocal technique, telling them to “use your diaphragm” and “sing on the breath” can be confusing, meaningless and unhelpful.
Piano Practice Blues
The first two phrases of this song don’t require a great deal of air to sing in one breath, so maintaining support isn’t as difficult.
But the next phrase is longer and includes higher notes. This combo requires more energy to maintain a consistent stream of air.

Teaching Tricks for Energising Breathing
There are several ways you can help your students energise their breath.
Breathing Ball
Using a breathing ball (also known as a Hoberman Sphere) is a great way to visualise your lungs and diaphragm expanding without getting into a technical discussion of anatomy. (If you don’t have an expandable breathing ball, have the students hold their hands out in front of them while imagining an inflating ball or balloon.)
- Have the student hold the ball closed while they sing the first eight bars (measures).
- While singing the rest of the bars (measures) 8 – 10, have your student slowly open the ball, expanding their belly as they sing so the ball is fully open by the end of the phrase.

If your student’s breath support is already good, you can still use the ball to help them shape the phrase. To add the crescendo-diminuendo shape, have your student expand the ball to the middle of the phrase then draw it closed toward the end of the phrase.
Lip Trills
Lip trills are when you vibrate the lips together almost as though you’re saying “brrr” when you’re cold.
Have your student hum the longer passage in measures 8-10 while lip trilling. Then have them sing the phrase again. You’ll probably notice a marked difference in the vibrancy of their sound.
Singing Tip No. 2: Open Your Mouth
Obviously, you have to open your mouth to sing. But I’m not referring to simply dropping the jaw.
An energised sound will be very difficult to achieve without raising the soft palate. (The soft palate is the back part of the roof of your mouth, where it’s spongy.)
If you want to use blues singing as an ear training tool in your music teaching studio, your students will need to open their mouths.
Teaching Tricks for Opening the Mouth
Telling a student to raise their soft palate is a lot like saying “use your diaphragm”. It isn’t constructive if they don’t understand how to actually do it.
Help your students understand how it feels to raise their soft palate by using these tips.
Flare the Nostrils
What I like to call your singing “resting face” 😉
Raise the Eyebrows
Much like flaring the nostrils, no one questions the look on the face of a singer who raises their eyebrows.
Smell a Flower
Not literally, of course! Have your student inhale with their mouth closed and imagine they’re smelling a flower. This little trick will help them feel the amount of space needed for making a full, rich, resonant sound.
Plug your Nose
Yes, literally! If your student’s voice sounds nasal, as though they are singing “through their nose”, have them plug their nose while singing the first verse of “Piano Practice Blues”.

Then have them unplug and sing the verse again. This will generally “force” the soft palate upwards creating a more open, full sound.
Singing Tip No. 3: Bring it Forward
All singers want to be able to project their voices safely and without strain. Singing with energy and a raised soft palate will help in that effort but a forward placement of the voice is also required.
Vocal exercises that use consonants like “m”, “n”, and “ng” are excellent for bringing the voice forward.
Teaching Tricks for Bringing it Forward
Let’s again use the “Piano Practice Blues” as our example.
Once your student has the melody down, have them hum a phrase or two (or the whole first verse) with their tongue on the roof of their mouth making an “n” or “ng” sound.
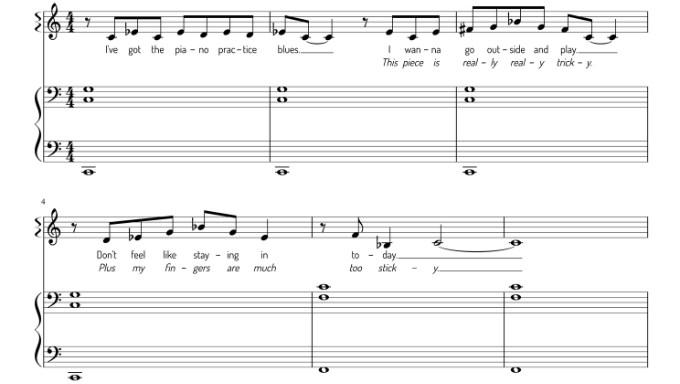
Then have them sing the lyrics as usual. You will probably notice a clearer, fuller tone that is stronger and…well, louder.
Singing Tip No. 4: Express it!
Blues music is certainly a style which encourages feeling. And singing with expression is the perfect path toward playing with expression – great use of singing in your piano lessons if you ask me!
Teaching Tricks for Boosting Expressiveness
To prompt your student to use greater expression, demonstrate by telling them about a time you didn’t want to practise. It needn’t be a true story (although they’re certain to ask if it is true! 😆) Just be as expressive as possible in your storytelling.
Discuss with your student how you were louder in some parts and softer in others. Point out how you used your face, body and hands to express your feelings.
Next, have your student come up with their own “I don’t want to practise” story. Encourage them to be expressive through dynamics and body language.
Help your students use this story to create a mental picture they can draw upon while singing.
How do you help piano students who are reluctant to sing in lessons?
I’d love to hear about your favourite tips in the comments below.
For more resources about singing, ear training and more, you’ll love the resources on Nicola’s Music Theory hub page.
So much useful information. I bookmarked your site so I can easily return. Thank you.
http://www.moorefarmpianostudio.com
Thank you, Bruce! I’m glad you found it helpful:)