Have you ever thought about creating a piano mashup with your students? It’s easier than you think and there are so many learning opportunities.
⬆️ Listen to the podcast above or keep on reading, whichever fits your style. ↙️
Creating a piano mashup – where a few existing songs are ‘mashed up’ together – can help your student to learn about keys, form and genres of music.
If you choose to have them work out the songs by ear, they’ll also gain huge confidence in using their ears to play and become much more active listeners in general.
All for it?
OK! Let’s dive into the step-by-step process I followed with each of my students to create their own awesome piano mashups.
Step 1: Choose the Songs
We chose to do a dedication theme for our mashups, so I asked my students to ask 3 different people for a list of 5 favourite songs.
The idea of choosing 3 people is that you can create a piano mashup of 3 different songs to represent 3 important people in the student’s life.
We asked for 5 songs from each person so that we had choice.
This is the biggest pitfall you can fall into so listen up! If you only ask for each person’s favourite song, you might get this…
And what are you going to do with that on a piano?
So make sure you ask for multiple songs from each person.
If you’re going to ask just one person for their favourite songs (e.g. you want to use the student’s favourites,) ask for 10. That way you’ll still be able to find 3 that are workable. 🙂
Step 2: Learn (Bits of) the Songs
A very important piece of wisdom that I learned from my friend Tim Topham years ago is to always ask the student which bit of the song they want to learn.

If you start at the beginning but the chorus is the part everyone knows, they’re going to be disappointed. They’re probably not going to learn the whole thing – just enough for the mashup – so start at the bit they like and know best.
As for how they learn the song, you have several options.
Personally, I like to use this as an opportunity to play by ear and have the student work out as much as possible by themselves. You could also use sheet music or teach the song by rote, though, if you prefer.
Step 3: Transpose and Tweak
You’ll probably spend several weeks working on the individual songs or bits of songs if you’re going the ear-route. Take your time with this and enjoy the process!
Once they can play these pretty securely, it’s time to make them easier to mash up.
If you’re teaching beginners, the simplest and (I believe) most educationally enriching option is to transpose each of the songs to neighbouring keys.
Work out the original key
Have your students work out the original key of the song first. Here’s a process to follow for that:
- Work out every note which is used at least once in the song (or part of the song.)
- Play the notes from low to high, as if they were a scale.
- See which scale it matches and play that to check that it sounds right. (If you’ve just played the melody in A major and then play a D major scale, it will sound instinctively wrong to most students).
If there’s still some debate between a couple of different keys, have them play the tonic of each key as if it were the end.
For example, if they think it could be in C or G major (because there are no Fs or F sharps in the song) they should play the melody followed by a low C. Then, repeat the melody with a low G at the end. Which sounds like coming home?
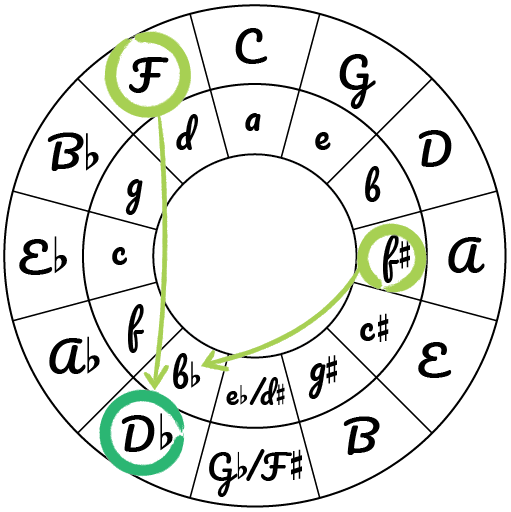
Find the keys on the circle of fifths
Once you’ve worked out the keys of each song, find them on the circle of fifths together. Explain that the goal is to have the songs in keys which are close together so that the jigsaw pieces click in place.
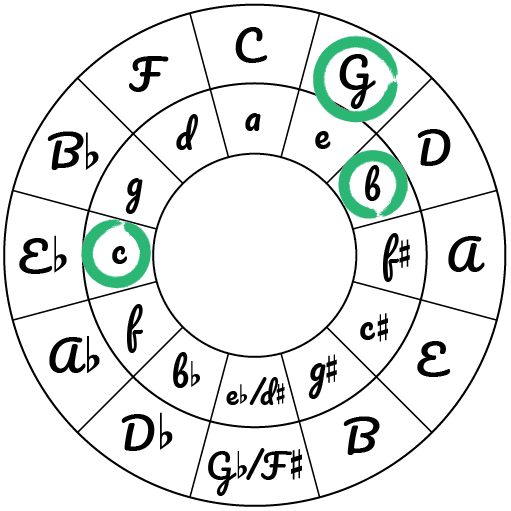
In many instances, you’ll have 2 songs which are already close together. If that’s the case for your student, just work on transposing the third one to a closer key.
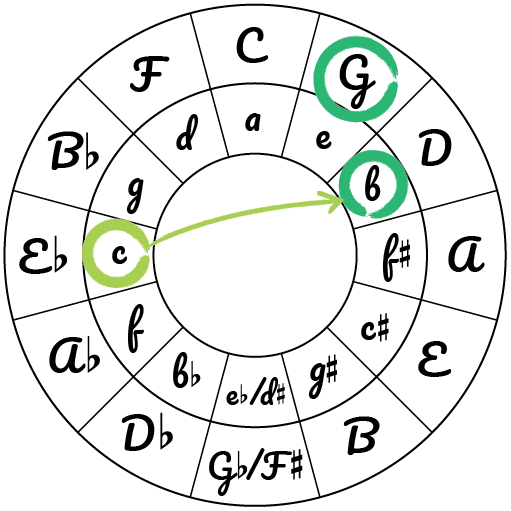
If you have 3 songs which are at distant points on the circle of fifths, you’ll need to keep one where it is and move the others.

I recommend keeping the one which is the most technically challenging in its original key. That way your student doesn’t have to relearn how to play that song.
Once you’ve worked on the transposed versions together, make sure your student practises these until they’re comfortable with the new keys.
Step 4: Create Your Piano Mashup
Now that the songs are in neighbouring keys and your student knows them inside-and-out, we’re ready to create a sensational piano mashup!
I actually call this ‘melting the pieces together’ when talking to students. Mashing just sounds so forced and harsh to me. 😆
Decide which song will go first, then find the perfect melting point to the next song. Repeat for the third song. Easy.
To find the perfect melting point, we hunt through for a place where the two songs play the same notes and simply transition from one to the other right there. It really couldn’t be simpler once the tunes are in closely related keys.
Bonus tip: I like to return to one of the previous songs for the ending to round it out. So our piano mashups typically go:
- Song A
- Song B
- Song C
- Song A or B
- End
Speaking of endings, make sure to add a little flourish there which is suitable. A glissando, arpeggio run or fade-out never did anyone any harm.

Step 5: Polish the Piano Mashup
Your student has put a lot of work into their piano mashup, so you want make the most of it. Get them to polish it up and consider using it as a performance piece or recording a video to share with those it’s dedicated to.
If they love it, you could make it the go-to party piece they always keep in their back pocket, ready to show-off. 😉
Have you tried to create a piano mashup with your students?
How did it go? What did you do differently to the process outlined above? I’d love to hear your thoughts and experiences in the comments below. 🙂
For more ideas on using creativity to teach theory concepts, check out my page devoted to Teaching Creative Music Skills.