How do you help piano students who have consistently collapsing fingertips? No matter what you try, or how much you coax, some students just cannot seem to keep their top finger joint rounded and firm.
Collapsing fingertips is a common problem for our youngest students, and often irons itself out as they get older and their dexterity grows. But what do you do when the problem persists? How do you avoid saying the same thing over and over and over?
Note that ‘floppy fingers’ shouldn’t be confused with ‘fused phalanges’ (AKA poker-straight fingers or flat hands.) If piano students have the floppy finger predicament, their hand shape will be curved but their finger joints will bend backward as they play the keys. This is common in young students, especially with those who have long, slender fingers.
Below are my top 5 go-to solutions for the dreaded collapsing fingertips. Keep these five things in your memory bank and you might just avoid pulling your hair out the next time you come across this issue.
The content in this post was originally published in August 2016 and March 2017. It was edited and substantially updated in July 2021.
Cure #1: The Bionic Pianist
If you suspect the student’s fingertips are collapsing because they’re pushing too hard into the keys, they might just need some temporary bionic hands. This is a great way to change the way they move and think about their arms and hands at the piano.
In Lesson
Bionic Hand Step 1: Pencils
Give your student a pencil (preferably one with an eraser on the end.) Ask them to hold the pencil in their hand, eraser side down. This is their new “bionic hand”.
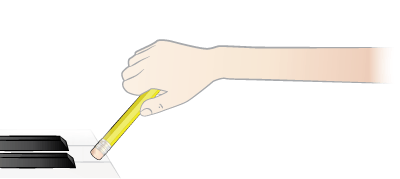
Tell them to play their piece using their bionic hand, and encourage them to move their whole arm up and down to play each key. They shouldn’t lock their wrist, but it should be kept in a reasonably stable position making a straight line from their elbow to their knuckles.
Have them use the bionic hand to play one hand at a time first, and then hands together.
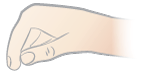
Bionic Hand Step 2: Braced Fingers
After several repetitions using the bionic pencil hands, tell them they’re going to try a new type of bionic hand now.
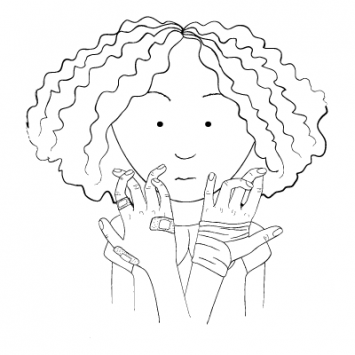
Help your student make a closed hand shape with their thumb behind her second finger, supporting the joint (sometimes called a “braced finger” in piano method books.) Tell them to play their piece with this new bionic hand, keeping the same motion in their arms they used when playing with the pencils.
Repeat this several times, changing around which finger they support with their thumb.
Bionic Hand Step 3: Open Hands
After they’ve tried out each finger in a bionic hand shape, they can open their hands out once more to play. Ask them to play their piece with regular fingering now, while imagining that a thumb is strengthening each finger behind the knuckle or that their fingers are as firm as a pencil.
Don’t rush your student to play legato with their bionic hands, but if they do try it themselves and manage to keep their fingertips firm, don’t discourage them either.
At Home
Assign practice of each of these stages, reducing the number of steps according to the amount of time your student has to practice each day.
For example, if they have time for 3 repetitions of each song, they should do the first with bionic pencil hands, the second with bionic braced fingers (they can choose which finger) and the third with an open hand shape.
Continue to assign this type of practice for your piano student until the floppy finger predicament is cured, and reassign if the problem rears its ugly head again at any stage.
Cure #2: Tap Drills
Tackling the floppy finger predicament away from the piano keys can really help students who struggle to control that pesky top finger joint.
In Lesson
Tap Drills Step 1: Warm-up Experiment
Close the piano lid or move to a table. Hold your right hand over the hard surface and demonstrate by tapping down with your fingertip in a nice curved shape. Ask your student to copy you, and try out each finger. Correct her action as needed, explaining which part of the finger she should be tapping with and the right technique to use.
Tap Drills Step 2: Tap Out the Music
After warming up with each hand, tap out your student’s piece together. Tap the right hand first, then the left and then hands together – all the while watching their hands for any collapsing fingers or awkward technique.
Tap Drills Step 3: Back to the Keys
Once the Tap Drills are completed, return to the keys and tell them to keep the same firm feeling in their fingertips. If a finger does fall down, pause the playing and ask them to tap that finger on the fallboard or bench to “test” it, and then restart from that spot.
Repeat the ‘Tap Drills’ before each and every piece.
At Home
Assign ‘Tap Drills’ for each piece during the week, and ask a parent to help with reminders if possible. You may need to assign fewer pieces due to the extra time it will take your student to practise each one, but it will be worth it if you can fix her floppy finger predicament.
It’s important that you follow through with this in the next lesson and continue to expect the ‘Tap Drills’ before each piece.
Over time, your student will carry the process over to their home practice if they form the habit during the lesson.
Note: Bionic Hand and Tap Drills are both taken from my book, ‘The Piano Physician’s Handbook’. The Floppy Finger Predicament is just 1 of 32 different ailments you’ll find in the book, along with their cures. Grab it in ebook or hardocpy on Amazon or wherever you like to buy books. Want a preview? Enter your details in the box below and I’ll send you an excerpt from the book.

Subscribe to the newsletter and get the floppy finger predicament excerpt
Enter your details to subscribe to the newsletter for piano teachers with information, tips and offers.
I hate spam as much as you do! I will only send you emails related directly to piano teaching and you can unsubscribe at any time.
Cure #3: Zechariah Zebra
Zechariah Zebra is an exercise from the fabulous Piano Safari. During their research for the Piano Safari method, Katherine Fisher and Dr. Julie Knerr found some form of this exercise (under different names) in many different teachers’ approaches to collapsing fingertips.
The repeated non-legato notes help students to really hone in on their fingertip shape.
In Lesson
In this video, Dr. Julie Knerr does a great job demonstrating how to teach Zechariah Zebra to students during a lesson.
I have seen this particular exercise have fantastic results with many students. As well as playing it on the piano, we also “play” this on tabletops, drums, and each other’s arms. It’s a lot of fun!
Zechariah Zebra is best taught by rote so the student can focus on their technique rather than on reading the music. As always with rote teaching, you’ll want to review it several times during the lesson so it’s really lodged in your student’s mind before they go home to practice for the week.
At Home
Include ‘Zechariah Zebra’ in the weekly practice assignments (either on the closed piano lid or on the keys.) You can also email the parents this reminder video just in case the student gets home and completely forgets how to play the exercise.
Cure #4: Spider House
For my youngest students, I often use a little story to remind them to arch their hand (the pre-cursor to firm fingertips.) I tell them to imagine a cute little spider is sitting underneath their hand on the keys. We don’t want to let our hands fall, since we don’t want him to think his house is falling down!
In Lesson
You can use a little prop or toy for this, or the spider can just be imaginary. My favourite thing about this approach is that it’s fun. It doesn’t feel like nagging to exclaim about the spider’s house falling down! It’s also a much more convincing reason for a 4-year-old to have good technique than ‘because I say so’.
At Home
If possible, invite mom or dad in at the end of a lesson and ask your student explain the ‘Spider House’ to them. Ask the parent to help keep the story alive at home when their kiddo is practising.
Cure #5: Putty
Irina Gorin (Tales of a Musical Journey) and Dr. Julie Knerr (Piano Safari) both suggest using putty in lessons to give students the feeling of firm fingertips and help them develop a warm tone.
This is something I still have to experiment with more myself, but I think it’s a really interesting approach to the floppy finger predicament. As you can see in the video, kids definitely have fun with it!
Let’s hear your top solution to collapsing fingertips!
These are just my favourite five, but I’m sure there are more out there. Share your favourite tip or trick in the comments so we can all benefit from it 🙂. Then hop on over to my Planning Piano Lessons page for the latest and greatest in all-things-technique.
These ideas for fixing floppy fingers are very welcomed! I’ve tried a few things but I’m eager to try these techniques and consistently reinforce them to solve the problem. Thank you for sharing!
Ooh great! I hope the strategies help to “cure” some of your students for GOOD Leeanne. 🙂
Great suggestions. I will definitely try them! No matter how many strategies Ive used some kids just dont seem to ever get past the floppies. But I imagine its partly lack of home practice. I do have an additional question-some kids will keep the fingers stronger only by tensing up their hand and arm. A huge no no! Getting them to relax is just as hard as getting the finger tip to not flop. How do you deal with this problem?
Hey Kim. That definitely is a common side effect, and is usually caused by them not involving their arm weight. Are the students using legato? If so, I would recommend them playing everything non-legato for a while until they start to use their arms.
Thank you! I have a student that needs these ideas. He is a hard worker and his Mom is a great helper at home so we should be seeing progress soon.
Sounds like a dream student Kathy!
When you talked about tapping the student’s piece on the keyboard, did you mean that they are to tap the rhythm with all fingers at once, or tap individual fingers as if they were playing the notes? I’m wondering because one of my students struggles with directional reading, and she barely recognizes when the notes change, much less what fingers she should use. Maybe whole-hand tapping or some other exercise would help her with the floppy fingers – or just working on directional reading first, haha!
By tapping out the piece I mean tap the correct fingers, but on a hard surface such as the closed piano lid. This does help with reading also because it takes some of the pressure off and they can concentrate on just the patterns. If she is still struggling, go through and have her say the finger numbers that will play each note while pointing.
One thing to check is bench height – student’s elbow at level of tops of white keys. This puts their arm at the right height to support each note. Another is to make sure their feet are resting on a flat surface, helped by a pedal extender, foam squares, or a book. Thanks for these tips Nicola!
Amen and AMEN, Helen! That’s such a big part of my kids’ technique issues. And is it just me, or do SO many more kids have hypermobility issues these days?? I’d say nearly ALL of them have “pits” where their “knuckle mountain” should be. Maybe it’s the vaccines. Sorry… that joke is probably in poor taste right now. Vaccines save lives!!
Let me just follow up on my last comment. I was trying to make the point that “back in the day” I came across kids with hypermobile hands only occasionally. Now, it seems to be the norm. I was totally kidding about the vaccines, but what then is causing this phenomenon? Maybe it is just my imagination.