Sometimes, your student is just not feeling the lesson you’ve planned and you need some fresh inspiration to stop the lesson from getting stale. Learn how to teach the 12-bar piano blues and you’ll never be stuck on what to do when a student hasn’t practised or is out-of-sorts.


⬆️ Listen to the podcast above or keep on reading, whichever fits your style. ↙️
Being able to teach the 12-bar piano blues at the drop of a hat is a great trick to have up your sleeve.
There isn’t just one way to teach the blues, of course. But in this article, I’ll explain the method I’ve used countless times now to rescue a lacklustre lesson.
Jump in with this step-by-step process any time you feel like your student needs something fresh and different.
Step 1: Map It Out
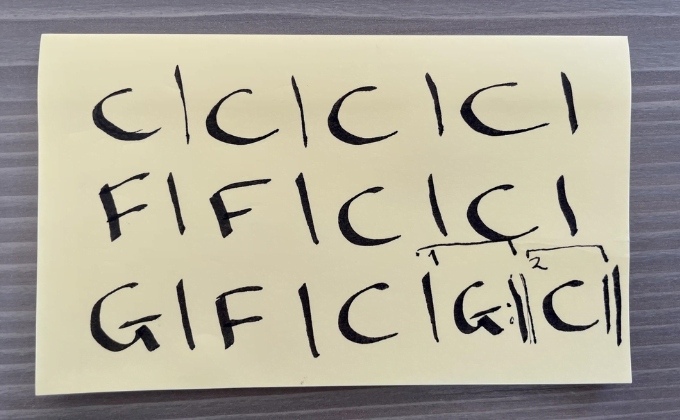
The first thing we’ll get students to do is to create the 12-bar blues pattern on a spare bit of paper.
I do this quite mysteriously, not telling them what we’re actually doing yet. This is part of waking them up from whatever malaise I feel they’ve fallen into!
I say something like, “Hey, grab some paper and a pen! Ok, ready? Write a C. Now another C. Oh and two more Cs…” I go on like this as if the letters are just occurring to me until we’ve got the pattern laid out in a 4 x 3 grid.
Once they’ve got all the letters written down, get them to draw the barlines. Depending on the student’s level, you may like to add a 1st and 2nd ending with the dominant and tonic (so that it essentially turns into the 24-bar blues).
Step 2: Root LH + Chord RH
Hopefully, that little writing exercise only took about a minute! It’s time to get them playing.
For intermediate students, you can ask them to play the root in the LH and the chord in the RH straight away. If the student doesn’t have much experience with chords, have them do it hands separately first.
Whichever version they’re playing, ask them to hold each note for 4 beats. As they go through the pattern, start improvising little blues nuggets over the top (without telling them you’re going to.)
Visual chord charts can be a great resource for students who are new to chords. Grab a free copy for yourself by entering your info below.

Subscribe to the newsletter and get the Visual Chord Pattern Grids
Enter your details to subscribe to the newsletter for piano teachers with information, tips and offers.
I hate spam as much as you do! I will only send you emails related directly to piano teaching and you can unsubscribe at any time.
Vibrant Music Teaching members can download the major and minor visual chord grids, plus many other fantastic chord resources, from the VMT Printable Library. If you’re not a member yet, learn more and sign up at vibrantmusicteaching.com.
Step 3: Transpose and Duet Improv
We want to make this as fun and as much of a quick win as possible, so before they become the improviser, we’re going to switch keys. Although C may be the simplest for learning the chord pattern, the E flat minor blues is the easiest way to learn the scale as it’s just the black keys + A.
So going back to our scrap of paper, have them write out the pattern again, this time in numbers instead of C, F and G. If your student already knows Roman numerals, go with that. If not, use regular numbers.
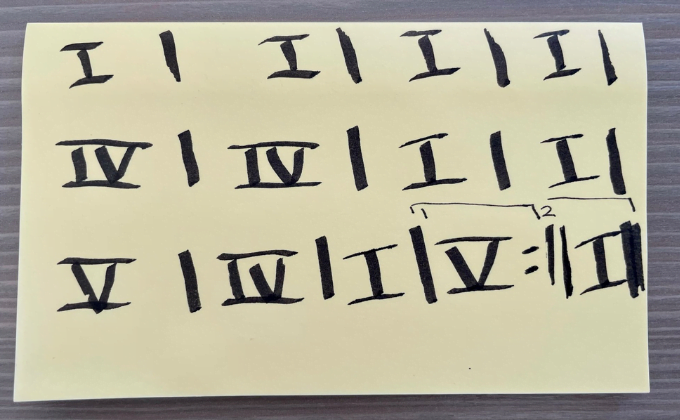
Once they have the pattern rewritten, tell them that 1 (or I) is going to be E flat. Ask them to work out what the other notes will be and get them to play through the pattern in the new key a couple of times.
Then, swap roles!
Have your student scooch over and show them the E flat minor blues scale. Take over their accompaniment job and have them improvise over the top.
If you want to explore the blues in a deeper way, you’ll love this article by expert teacher Gillian McCoy.
Step 4: Solo Improv
The final step is for your student to improvise by themselves. I like to describe this as playing with the LH (root notes, chords, fifths or whatever works for your student) and answering with the RH.
When the LH plays first and the RH calls back with a little riff, it tends to be easier for students to keep the beat going. Over time, they may get more comfortable and get into more of a true hands-together improv, but we want them to have success and sound awesome right away.
Do you teach the 12-bar blues as a way to shake things up?
What other tricks do you have for when students need something a bit different? I’d love to hear your suggestions in the comments below.
For more expert ideas like this one, check out my Planning Lessons hub page.
Hi, thanks for all the suggestions above. Can I check please – when you advocate switching to the E flat minor blues, do you intend the chords to be E flat major or E flat minor? Similarly with A flat (chord of IV)? I know you want E flat minor notes in the right hand improv (i.e. all black notes + A natural), but not sure what you had in mind for the chords – major or minor?
Many thanks.
Hi Gillian, we mean the E flat minor blues scale over an E flat major blues, so we are gonna have I, IV and V dominant chords.